I know it's a busy time for all of you and I also know this is the time family and friends stop by, or you visit or you attend Holiday Festivities. It's also a time, in the age of cell phones, that we all have a camera in our pocket so lots of Holiday photos will be taken. In that I have created a wonderful, durable, mini with very flexible pages and oodles of room for photos. Enjoy --- Patti from A Soul's Heartbeat
First off let me say I love Stamperia's Make a Wish paper collection, the images are amazing and the paper gives you so many opportunities to create with it. Here I've made an 8"x10" mini with 5 interactive pages, flips, flaps, pockets, tuck ins, etc. etc. ect. I used Crafty City's Make a Wish Kit to create my mini.
Note - This mini is created using an additional pad of 10 sheets of the Stamperia paper collection. With that being said you could always get the kit and add your own stash of complementary Holiday paper, prints or solids to expand what's available in the kit.
The cover of the mini highlights the resin frame that came in the kit along with the velvet leaves and poinsettia flowers. I fussy cut the angel and popped her up on a gold foil doily that I'd cut from my Cricut. I detached her wing, popped it up and added the gold lace behind before placing it under her and over the frame. I don't always add a lot of frills to the outsides of my minis but I love the how your eye pulls directly to the angel and that's the first thing you see.
The inside front cover and page one. Page one has been divided into four sections each with a pull out photo mat behind the gorgeous images on the paper.
Page one is a tri-fold which attaches to the page above (the four divided photo spots). I have used torn muslin fabric to act as the hinge to hold the pages together. This provides a very flexible page construction.
The tri-fold folded and the facing page two.
The inside of page two, with a large flip up, tuck in pockets and tags.
The back of page two has a large pocket with tags. The front of page 3 has a curved slit behind the angel to hold a slip in tag. With the tag removed the paper is whole and beautiful. Your choice how you choose to use it. The slit for the pocket has been trimmed with a piece of the muslin.
The back of page three has a large pull out bifold to house up to 5"x7" photos. The front of page four (another tri-folded with muslin hinges) has been left free to place your photos wherever you choose over the paper images.
Here is the front of the second tri-fold
And the inside of the tri-fold with a large slip in pocket
The folded tri-fold on the left and the expandable photo mats on the right.
The back of page five and the inside back cover
Hidden inside page five is a magnetized photo op to hold four framed pictures.
Inside of page five (the frame surprise backs the right side in this photo)
Thank you everyone for sharing your time with me. I hope you like my new mini and hope you'll pop over to the video walk through where you'll really be able to get the jist of this new construction. I'll also be uploading a video tutorial series to share how to put it together.
Hi everyone! I have a new video up sharing the preview of my newest kit from Archana, Make a Wish, showcasing one of Stamperia's latest collections and one of my very favorites so far!
Archana has kindly set the shipping on this (at this time) to free
so if you are interested in the kit buy it now
to save those shipping dollars.
(I believe this must be a USA purchase to qualify but double check with her)
Hello crafty friends, today I'm sharing my part in the Crafty City and ReneaBouquets Design Teams joining forces to bring you some fun beachy summer inspiration.
Crafty City supplied papers from the Mintay Paradise Collection and some wonderful tiny flowers from Prima that were the perfect colors. ReneaBouquets made up two different Treasure Boxes of goodies for us. I got Box #1 and will list at the bottom of this post what was included, but trust me it was stuffed with wonderful goodness!
My project measures 8"x10"x2" and I call it a mini but it's not really it has two swing-out flaps front and back, some humongous pockets and a waterfall flip spine, Something different for you to try. You can see with this view of the front I've used the Teal Pearl & Rhinestone Button sitting atop a rosette of gathered Mint Tulle Lace; the Board Laser Cut Chipboard Small Mermaids Welcome Sign; Flatback Pearls Cotton Candy and the Silver Pink Shard Glitter from the Treasure Box #1 and a panel cut from that gorgeous Mintay paper. The fun cargo netting oh that's recycled from a bag of fruit. I'm sure I read it's a law that crafters never throw away anything right?
On the inside front and back cover I attached a flip out which houses these huge pockets on both sides of the flaps, front and back. You can also see my staggered waterfall flips on the spine in this photo.
There are four of these large pockets which were made from fussy cutting the focal point on the collection paper. I backed each fussy cut piece on Kraft cardstock and then yep, I fussy cut it again and attached it to the teal flip but only on 3 sides forming each pocket. I've included this extra large mat and a smaller one in this pocket.
The spine has four swing flaps, attached like you would a waterfall. They increase in width by one inch and they stagger one inch below the one above. It's a great showcase for photos or odds and ends from a trip.
What's hiding in that pocket you say? Well I dug out some paper bags I've had for eons that my friend Kathie had gifted me. I'll share on video how I cut and used them in the project. The inside of the bag, which is what I'm showing you here, has a separation so you can stick mats, photos, tickets, whatever on both sides of that divider.
Here's a front view of the same flap, the end part of the paper bag is what my mermaid is sitting on and it forms a great pocket to tuck your mat into. Because I only received six decorative papers I used everything including the header on the paper that said Paradise, how could you toss that?
In my Treasure Box I had two frames, both I colored with different mists I had so they would blend in with the color scheme. I inserted a piece of acrylic behind the frame and backed it with the teal, I have a little pull tab on the template for the photo size that pulls out from between. The laser cut pieces included are fantastic. This was my first time using any ReneaBouquets pieces and I was impressed.
There are so many places to hold photos, like the printed cardstock frames and the two pockets on this flap. I think I'll stop here, I really want you to pop over to YouTube and see the complete walk through. I'll be posting how to videos shortly so stay tuned.
Enjoy, enjoy, enjoy the goodies from both Crafty City and ReneaBouquets with this fun Design Team collab. I've got a couple of coupons for you to use -
At ReneaBouquets take an additional 10% off your Treasure box by using the code PARADISEPATTI (in order for this code to work you must use ALL CAPS). Copy and paste the coupon code into the promo code box at checkout to get your additional 10% off your Treasure Box. Only one coupon per order please. Please note coupon codes can not be combined.
Over at Crafty City use the coupon code “GoldSand” to recieve 10% off anything in the store
We here at craftycity.com are so excited to be collaborating with reneabouquets.com. We will be sharing many awe inspiring creations from both design teams and I cannot wait to see all the amazing projects. I have created a fun and easy mini album that is 7 inches wide and over 8 inches tall. Creating this album with both kits was an opportunity of a lifetime! All the products from both companies were absolutely stunning! Crafty City sent me a kit that contained Mintay Paradise papers, stencils, flowers,charms, Prima ink and much more definitely had all the vibes of the Salt Life. ReneaBouquets sent me the Treasure box #1 kit. This kit was filled with iridescent Unicorn Candy pearls, flat back pearls cotton candy, Handmade butterflies, dragon flies, gorgeous chipboard mermaids, glitter glass and more.
For the cover of my album I used one of my favorite Mintay Paradise papers, the cabanas on the sand with the ocean in the background. I started off by adding the Fab Scraps chipboard that I painted white and then inked it to give it sea colored ombre effect. I also embellished the top of the chipboard with Renea's Diamond glitter glass and also added Renea's Diamond Chunky glitter glass to the waves in the ocean and on top of Renea's Chipboard starfish . One of my favorite items from Renea's kit was the silver pink shard glitter that I used in the sand. If you have visited Florida's beaches you will notice that the sand has a glittery effect that looks like sugar crystals. I also added Renea's gorgeous ocean sun kissed mermaid sitting on top of the wooden fence as well as her one of her "To Venus & back" glass glitter encrusted dragon fly's atop one of the large palm trees. I fussy cut a lot of ephemera and layered it with the foam dots and and added some of the Prima flowers from my kit and also from my stash and surrounded them with some of the Prima Melange Art Pebbles. Pictured below, you will see the spine of my album I added the shabby pink dream crochet lace that I cut in half and layered and then ombre painted the laser cut starfish and added the beautiful diamond and pink pearl rhinestone button.
Embellishing the front cover is always my most favorite part of making an album, but I adored making every part of this album. The inside of the album is loaded with large pocket pages and side pockets that are large enough to fit 4x6, 5x7 and even 8x7 photos. I also added in some smaller Prima tags from my stash that I added ephemera cards from the paper collection and surrounded the images with Prima Washi tape and added some of the charms from the Crafty City Paradise kit.
(inside cover page)
Pictured below is the back of my album. I just love the beach boardwalk look.
Don't forget there are discount codes from both stores!! I will add the links below as well, I have added a link to the full walk thru of my Paradise album as well as a full tutorial on how to make the base of the album. If you prefer written instruction I am offering a full written guide that I will add links below. Thank you so much for reading and watching my videos. I hope you love it as much as I do!
Crafty City links:
Discount Code: This code is for any items in the store, starting Aug.1 - Aug. 31, 10% off purchase code: GoldSand
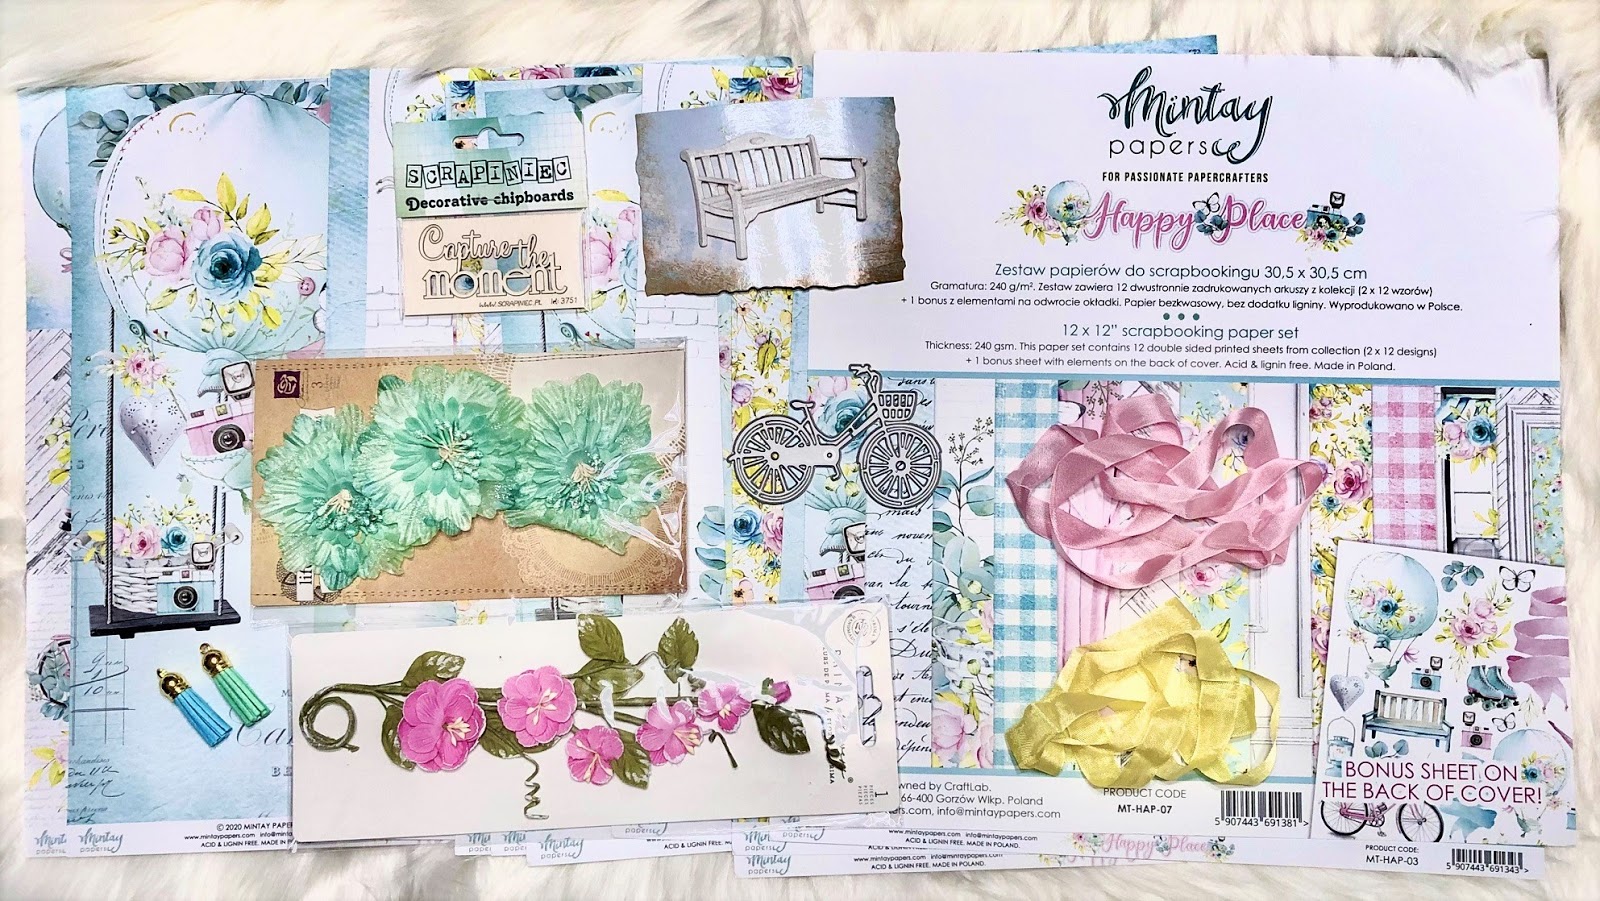
Hi everyone, it's Patti here and I'd like to share my latest Crafty City Design Team project using the Summer Blush Kit. This kit comes with everything you'd need to create either my mini or another summer project you have in mind. I opted to switch out the Pion solids that were included in the kit for solids from my crafty stash. I also pulled old old old embellishments I had tucked away. Don't be afraid to raid your crafty coffers when using a kit.
There will be a tutorial series coming later to share how to construct the mini and ideas for how I fussy cut and stretched the 8 designer papers from the Blue Fern Blush collection into four expandable pages.
My mini has four repetitive pages, in other words once you get the jist of the first constructed page you just simply duplicate and repeat, I have four pages but the skies the limit to how many you can add. With this sort of mini you have ample room for the smallest Instagram and iPhone photos to extra large 7 1/2" square ones. Trust me you can stuff a lot of memorabilia and photos into these four pages.
Included in the kit was a pre-cut chipboard frame from Scrapiniec. These come plain brown chipboard color which leaves the maker the freedom to change the color to anything that fits. You can see I choose an aqua/teal color here and throughout the book. I love the pop of color it gives. I've adorned the edge of the frame with flowers from the kit as well as one of my homemade ones and others from my stash. The metal butterflies, from my stash, were plain metal and again using Gesso, inks and paints I got them to match the color scheme of the collection perfectly. The photo is just for you to visualize how this mini would look with your own photos, it's not included and is a Heritage photo of my Grandmother and my Aunt, aren't they gorgeous!
The pages all follow the same theme, the left hand side has a gorgeous fussy cut tuck in spot for a huge mat (included) or many photos of your own. The right hand side is where the fun begins. Each section is secured with these small tab pages that are tied together with colored seam binding.
Here's a snippet of each of the four pages
When the ties are unlaced they open to reveal all these wonderful photo spots. On the left there is a tuck spot or pocket on the backside of the tab. On the right side there is a spot for either photos or a large bookmark, (I'll show you that in another photo). When the flaps are opened top and bottom in the middle you'll find three generous areas to place your photos. All have fussy cut tuck spots to hold the photos or treasures securely in place. Nothing is worse than picking up a mini and having all your photos fall out.
You know that spot on the right on the above picture, that has the two photo spots, well this is the front of that, it's an extra little place to house a tuck in, photo or journaling.
Here's a look at two other pages, same design, but different configurations. Fun stuff! This little flip out gives lots of interaction and the ability to add several more photos or journaling.
You'll find lots of little extras, like a letter on top of a letter. The paper has a pre-printed letter on it, so I cut around the bow and made my own envelope to slide into it. It's a place to tuck that secret little message you don't want everyone to see. Don't you just love that flower pull on the tag? Wow that's one of the Lemoncraft flowers that are included in the kit.
There were two of these flower sprays in the kit and you'll see I used both as tuck in holders. This one has a glassine envelope with some lovely surprises inside. On the top is one of the many butterflies you can fussy cut from the butterfly sheet which is included.
Each page has a large 7"x8" section that I had so much fun designing. I took the designer elements from the collection that appealed to me the most and fussy cut pockets for each of these pages. It may be a bottom full fledge pocket or a top tuck in one, either way they will hold all your photos securely. These tiny little envelopes are a mini stamp and die set included in the Summer Blush Kit. I added them to the fussy cut piece to extend the pocket and add more visual delights. If you notice, tucked in the pocket, is a circle. This pop out is from the frame on the front cover. I told you I used everything!
- Here are the other middle sections -
I always love adding a waterfall, you can house so many photos in such a small area. This time I copied an idea I saw a fellow crafter (thank you Diana for inspiring) use by cutting the focal point and just stripping the bottom of each of the flips below the first. The paper looks like it's just continues on and on and you don't loose any of the design this way. I love the look and when you are short on paper it's a wonderful way to conserve. Here's where I used that other spray as well, and the tuck in there is the packaging from the Lemoncraft Buttons in the kit.
So my friends here's a little look-see into my mini. I hope you'll pop on over to YouTube and see the full mini front to back and all the little hidden, surprise gems I didn't have space for here. This mini will be offered for sale so check out the description below the video on YouTube for the particulars. Have a great crafty day and be sure and check out the Crafty City store!


 The cover of the mini highlights the resin frame that came in the kit along with the velvet leaves and poinsettia flowers. I fussy cut the angel and popped her up on a gold foil doily that I'd cut from my Cricut. I detached her wing, popped it up and added the gold lace behind before placing it under her and over the frame. I don't always add a lot of frills to the outsides of my minis but I love the how your eye pulls directly to the angel and that's the first thing you see.


 You'll find lots of little extras, like a letter on top of a letter. The paper has a pre-printed letter on it, so I cut around the bow and made my own envelope to slide into it. It's a place to tuck that secret little message you don't want everyone to see. Don't you just love that flower pull on the tag? Wow that's one of the Lemoncraft flowers that are included in the kit.